How To Make Natural Dye Using Food From Your Kitchen

If you’ve ever wondered how to make diy natural dyes with food from your kitchen, you’ve come to the right place.
Making your own natural dyes is a simple process. And you can use them to impart the most amazing color to natural fibers. Even first-time dyers can complete this easy dyeing process in as little as an hour of hands on time.
Hands off time is considerably longer than that. A dye bath created using natural ingredients can take up to 24 hours to acheive the best results in your fabric. Often, the longer you soak your homemade dye the more vibrant the color becomes.
The key to successful natural dyeing is to relax into the process; don’t rush it. Delight in the fact that each different fabric and each different dye material will bring their own natural colors to the table.
Every time that you work with an all natural dye project it is like opening a gift. You cannot be sure what you will find inside until you remove the wrapping paper. With natural dyes you cannot be sure what color your fabric will be until it is finished and dried.
So, enjoy the smorgasboard of beautiful colors that you can create when you make plant-based dyes using food from your kitchen.
And if you need a non-toxic paint to bring color to a paintable surface in your home, be sure to give old-fashioned milk paint a try.
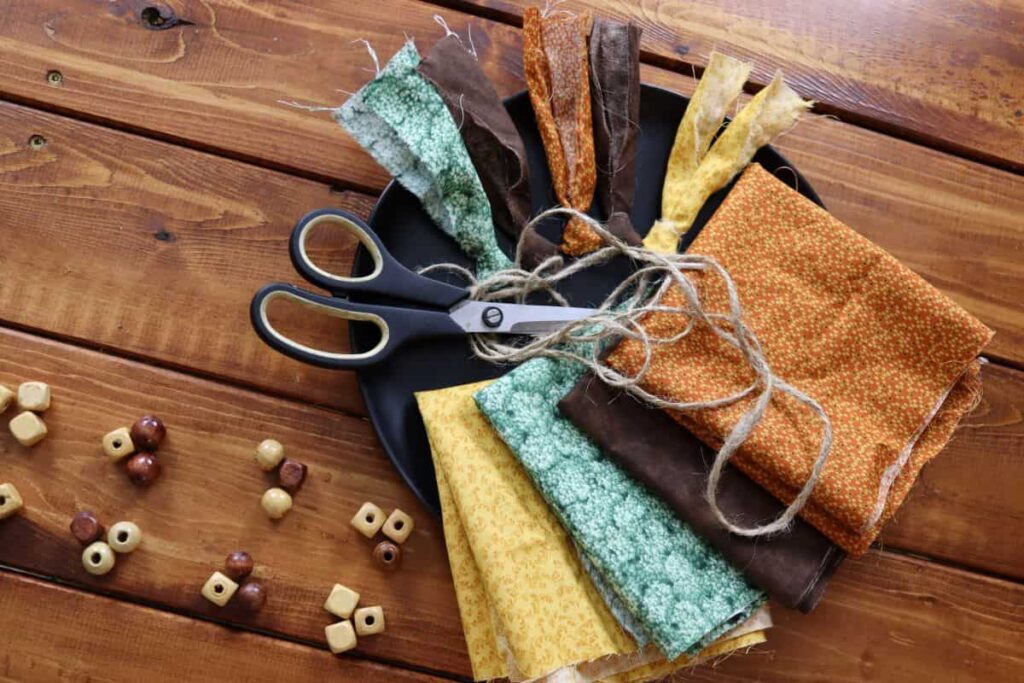
Or, if you’re looking for other simple DIY projects to bring handmade charm to your space, mini-macrame plant hangers, hanging tea light holders, reversible bento bread bags, and easy primitive garden markers are all great choices.
What can I dye with my natural food dyes?
When working with dyes made from plant-based materials it is best to avoid using them to dye synthetic fabrics. These fabrics will not absorb enough color from the dye to make it worth the time it takes to complete the process.
Go with natural fabric made from natural plant-based fibers for your dyeing project. Use materials like; pure cotton, wool, silk, hemp, muslin, or linen to get optimal results. The fibers in these fabrics are more open, and therefore they are able to absorb color better than their synthetic counterparts.
What color dye can I make using food scraps from my pantry, fridge, and spice rack?
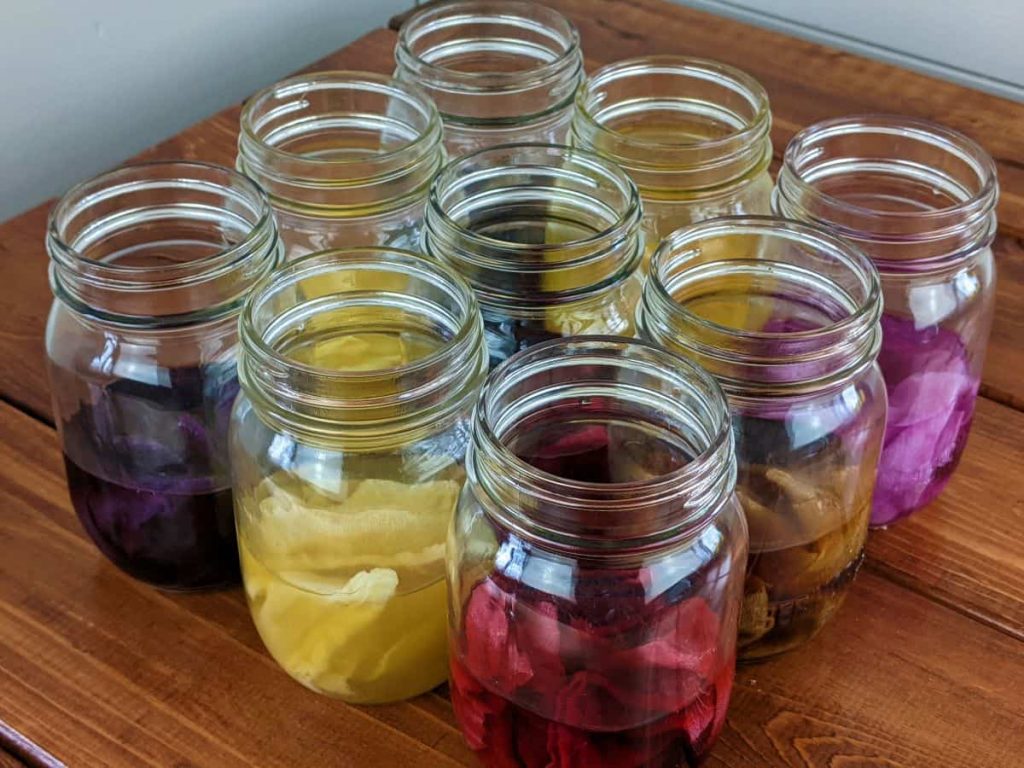
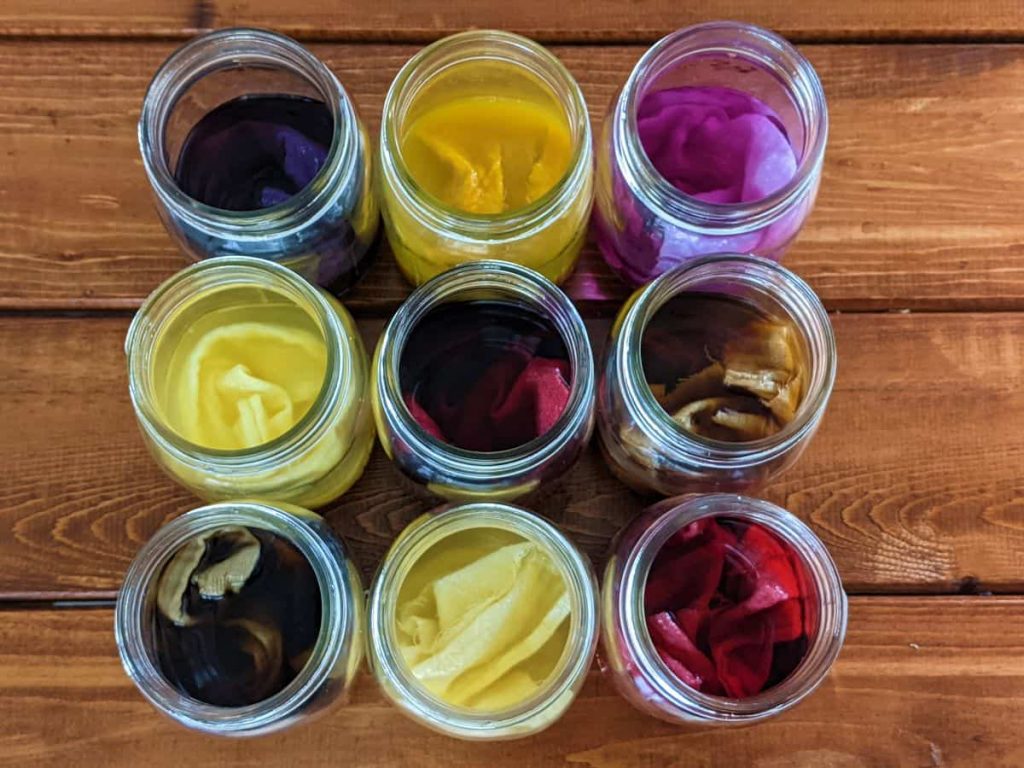
A wide range of colors can be produced from items found in the average kitchen. You can make lovely oranges, pinks, reds, blues, purples, yellows, and greens. You can even combine more than one plant material in your dye pot to create a broader range of colors and shades than a singular plant provides.

Because the list of plant materials that you can use to create natural dyes is seemingly endless, the potential to create unique colors goes on into infinity!
Can I trust the information I find on the internet about making natural dye using food from my kitchen?
I would think that most of the information that you find on the internet about making natural dye from natural sources is like any other information out there on the big ‘ol worldwide web.
Much of it is probably reliable. And much of it is likely just bloggers copying information from other bloggers/sources in order to get the post out there on their blog.
Point being, the information in this post is accurate. Or at least it is how each specific dye, in the following list, behaved in my own kitchen.
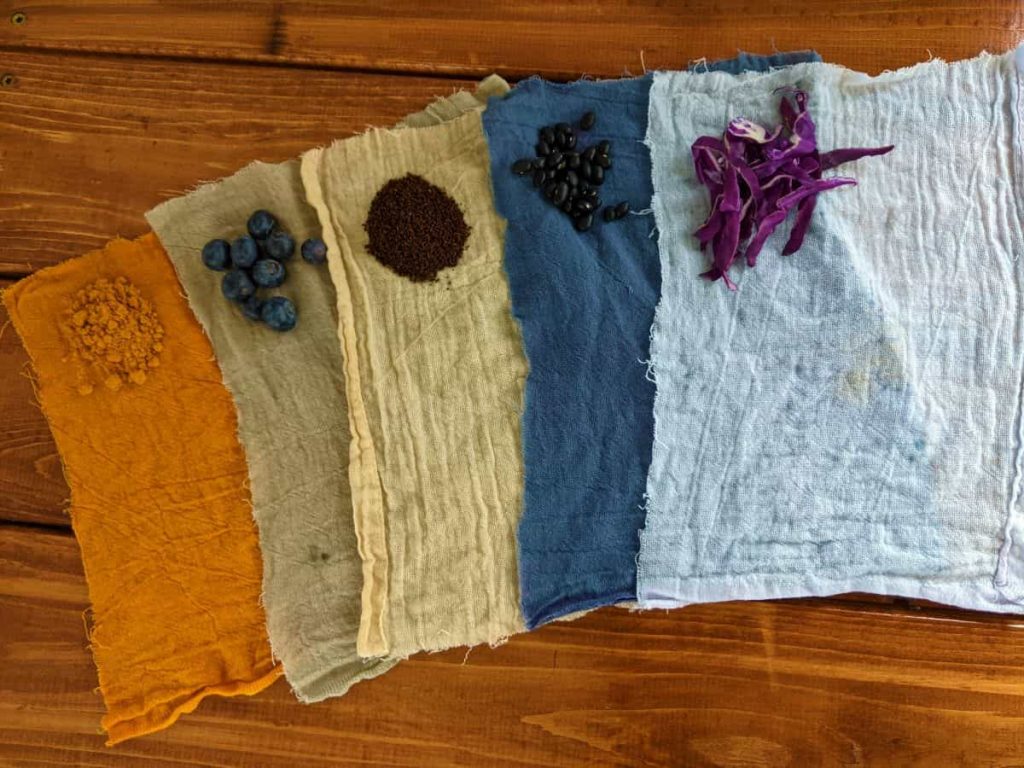
- Beets = reddish pink color
- Avocado skins/avocado pits = peach to light pink color
- Yellow onion skins = yellow orange color (I have no personal experience with this material)
- Red onion skins = pale orange color with pink undertones (I have no personal experience with this material)
- Spinach = soft celery to deep green color (This material did not produce a desirable result for me, pic toward bottom of post)
- Blueberries = light blue or purplish color
- Red cabbage = deep purple color (This material did not produce a deep color, it was pretty but very light, I have gotten deeper colors from it in the past)
- Orange peels = citron yellow color (This material did not produce a desirable result for me, pic toward bottom of post)
- Coffee beans = tan, biege, or taupe color
- Hibiscus flower petals = soft pink to dusty rose color
- Black beans = chalky blue color
- Ground turmeric = golden yellow color (It is my understanding that fresh turmeric works just as well as ground. I have not tried it yet.)
- Pomegranate rinds = golden yellow color (I have no personal experience with this material)
- Red clover = lavender color (I have never used red clover to make fabric dye. I have infused red clover flowers in white vinegar and it turns the vinegar a beautfiul lavender color. I suspect it would work the same as a natural fabric dye. Or it would at least impart a pretty pastel pink to natural fabric.)
- Black tea bags = tan or beige color
- Black walnut = dark brown color (I have never used black walnuts to make fabric dye. I have used black walnut powder mixed with water to make ink for a stamp pad. I used that stamp pad to put an image on muslin bags. It worked well.)
How to make diy natural dyes with food from your kitchen
It is always best to use organic plants when creating natural dye materials, as the chemicals that can leach into your dye from plants treated or fed with non-organic materials will potentially interfere with the colors they produce.
You’ll want to have at least 1 cup of whatever plant material you choose to use for your dye project for every two cups of water it will take to completely immerse the fabric you want to color.
This gives you a 1 part to 2 part ratio, which is a reliable general rule for creating natural dye. If the plant material is not already in small pieces, chop it well. Then place it in a stainless steel pot and cover it with water.
Place a lid on the pot and simmer your plant and water solution very lightly for approximately 1 hour. If the liquid produced by this process is not as dark as you would like it to be, you can simmer it a bit longer. Keep in mind that the color that it will produce in the fabric you dye with it will be lighter than the color of the dye itself.
If it is still not as dark as you would like, after you’ve simmered it a second time, go ahead and add more plant material to the solution and simmer it even longer. Throughout this process you may need to add more water as well. Add as little as possible so you don’t dilute the color of the dye.
Remember that experimentation is key here. There is no way to know for certain what color a plant material will produce, because there are too many variables involved when working with natural materials. The variety of the plant used and the growing conditions it was raised in are just two of the things that play a big part in the end results.
Over time you will develop an internal gauge that helps you determine when the solution you are creating is just right.
Would you like to save this post for later?
Once you have reached a color that you are happy with, turn the heat off and allow the solution to cool down to room temperature.Then strain the plant material from the solution, and you are ready to use it to dye your fabric.
While you’re waiting for the dye solution to cool you can begin to make the mordant to treat your fabric before you dye it. It goes without saying that natural mordants are the best way to go here. So, let’s talk about how to make them.
What is a mordant? And do I need one?
A mordant, also known as a fixative, is used to prepare fabric to receive and hold on to dye. By using a mordant, you will significantly reduce the amount of color that washes out of your fabric during the final rinse.

There are several different mordants available for purchase, but many of those that were used in the natural dyeing world for years (and unfortunately still are) have been found to be toxic.
You can avoid these toxic mordants by using natural materials like salt and white vinegar.
The basic rule of thumb for this application is to use salt when dyeing with berries, and vinegar when dyeing with fruits, vegetables, spices, and herbs. It is not a steadfast rule, but it is a very good guideline.
Using salt to make dye for berries:
In a stock pot large enough to hold the fabric you want to dye create a salt based mordant. Use a ratio of 1/4 cup salt to 4 cups water to create this solution. Then immerse the fabric in the salt based mordant and allow it to simmer on very low heat for approximately 1-2 hours.
Using vinegar to make dye for fruits, vegetables, spices, and herbs:
In a stock pot large enough to hold the fabric you want to dye create a white distilled vinegar based mordant. Use a ratio of 1 cup vinegar to 4 cups water to create this solution. Then immerse the fabric in the vinegar based mordant and allow it to simmer on very low heat for approximately 1-2 hours.
Dyeing fabric with your natural dye solution
At this point, your fabric is ready to dye. It is not necessary to rinse it before you begin the dyeing process. Simply allow it to cool completely and wring it out. Then immerse it in the dye solution that you’ve prepared for it.

You will want to use your hands for this step, in order to gain maximum control over the uniform saturation of the fabric.
Put on a pair of latex gloves, or you will find yourself in the comical predicament of walking around with stained hands!
I find that reusable latex gloves are a good thing in this case. Gloves are necessary and reusable latex gloves help reduce the waste that would otherwise occur by using disposable gloves.
Once the fabric is fully immersed in the dye solution, allow it to soak for at least an hour, or until you have achieved the desired color.
If you haven’t achieved the color you want after 24 hours, it is not very likely that you will attain it. At this point, the fabric has reached it’s saturation point for color absorption.
In order to get a darker color you will need to start the process over using a fresh batch of dye.
How to take care of your fabric after it has been dyed
After the fabric has been removed from the dye allow it to hang, or lay flat until it is dry. It is best to do this in a space where you are not concerned about the dye ruining anything, as it will likely drip from the fabric.
If it is possible to do it in an outside space, that would be your best option.
Once it is completely dry, take your dyed fabric and run it under cold water until the water runs clear. Then allow it to hang or lay flat to dry again.
If you prefer you can use a dryer to set the color in the fabric. Place the fabric in the dryer by itself and run it through a high heat cycle to do that.
The color of your fabric, after it has been thoroughly washed and dried, is the color it will retain. It may fade slightly, but if it is properly cared for it probably will not.
Treat it as you would delicate washables, using a gentle ph neutral soap and either hanging it or laying it flat to dry for optimal color retention.
Recommended For You …

If you try this project and love it, please give it 5 stars! It supports my work more than you may realize, and I appreciate that a great deal!
You can also show your support by tagging me on Facebook @sustainableslowliving and/or Instagram @slowlivingbydianegail when you post a pic of your finished piece.

Make Natural Dye Using Food From Your Kitchen
Equipment
- Note: some tools may become stained by the dye materials
- Pot for mordant: used to prepare the fabric and help the dye adhere
- Pot for dye: dedicated pot for simmering the dye ingredients
- Strainer or flour sack towel: useful for removing solid ingredients from the dye bath before adding fabric
- Dyeing vessel: large container or tub to hold the fabric and dye bath comfortably
- Gloves: protects hands from staining during the process (optional, but recommended)
- Large spoon: for stirring the dye bath and fabric to ensure even color absorption
- Measuring cups: to measure water, mordant, and other ingredients accurately
Materials
- fabric choice: cotton, wool, silk, hemp, or muslin work best for natural dyeing.
- water: for preparing the mordant and creating the dye bath.
- salt (for berry dyes): helps set the dye when using berries as the color source.
- white vinegar (for fruit/vegetable dyes): helps set the dye when using fruits or vegetables as the color source.
- natural dye ingredients: choose from berries, fruits, vegetables, spices, or herbs to achieve your desired color.
Instructions
- Prepare the Mordant:If using berries for dyeing, mix 1/4 cup table salt with 4 cups of water. Warm the water if needed to dissolve the salt.If using fruits, vegetables, spices, or herbs, mix 1 cup white vinegar with 4 cups of water.
- Soak the Fabric:Immerse the fabric in the appropriate mordant solution.Place the pot on the stove and simmer for at least 1 hour. For deeper color absorption, simmer for up to 2 hours.
- Prepare the Dye Bath:While the fabric simmers, prepare the dye bath.Add your chosen plant material and water to a pot using a ratio of 1 cup plant material to 2 cups of water.Simmer gently for at least 1 hour to extract the natural color.
- Strain the Dye:After simmering, strain the plant material from the dye bath using a strainer or flour sack towel.
- Wring the Fabric Out:Wring out the excess liquid out of the fabric.Do not rinse the mordant off before dyeing.
- Dye the Fabric:Place the fabric directly into the dye bath.Allow it to soak for 1 to 24 hours. Longer soaking times will produce deeper, richer colors.
- Remove and Dry the Fabric:Remove the fabric from the dye bath and wring out the excess liquid.Hang the fabric and allow it to dry completely.
- Rinse and Final Dry:Once dry, rinse the fabric thoroughly to remove any excess dye.Hang the fabric again and let it dry completely before use.
Notes
- Use Dedicated Equipment: Natural dyes may leave permanent stains, so it’s best to use pots and tools that you reserve specifically for dyeing.
- Pre-Wash Fabrics: Always wash fabric beforehand to remove any residue that may interfere with dye absorption.
- Achieve Darker or More Vibrant Colors: For deeper shades, repeat all of the steps of this process except the mordanting process. There’s no need to do that twice.
- Extend Dye Intensity: If the dye bath appears too light after simmering for 1 hour, strain out the plant material, add fresh ingredients, and simmer for another hour.
- Expect Lighter Final Results: The dye bath will appear much darker than the final color of the fabric. Be prepared for subtle, natural tones.
- Hang Fabrics Carefully: When drying fabric, both before and after rinsing, hang it where drips won’t stain surfaces or other items.
- Set Color with Heat: For better color retention, place the fabric in the dryer before rinsing to heat-set the dye. Be aware this may leave residue in your dryer — run a load of wet towels afterward to clean it. Use old towels that you are not concerned about ruining.
- Wash with Caution: For the first wash, launder dyed fabric separately to prevent color transfer. Monitor the rinse water for any excess dye.


Hello and Greetings from Ireland.
Thank you for this beautiful and thorough article! I found it because I want to dye some cheesecloth for junk and art journals, but you’ve inspired me to try different dyes as well.
So glad that my article inspired you to branch out with your natural dying experience. I hope you have great fun 😉
When dying with avocado pits and skins, would I use salt or vinegar as a mordant?
You would use vinegar for that Lauretta. I’ve gotten some really beautiful muted pink colors dying with avocado skins. Best of luck to you!
Have you ever tried mixing the natural items together to create another color? For instance, black beans with turmeric to create a green color? Or would I need to do each in a separate batch?
Wonderful article, I’m looking forward to start this process.
I haven’t experimented with mixing colors. I certainly think it would work though. And it would be a lot of fun too 😉
Thank you for this interesting post. Could you please explain your black-bean process specifically in more detail how you got such a beautiful blue.
Hello Jess.
The process is fully explained in the post. The black beans are done just as all of the other foods are.
I’m sure you’ll find everything you need if you read the post carefully. It would be quite time consuming to retype all of the information here.
Best to you on your home dying journey!
Did you cook the black beans to get your dye. Everyone else says to just soak them, so I am also curious as to your process, because your color is gorgeous. I was also wondering if you ever use a tannin and what your results were. I’m in the experimenting process and want to keep it all toxin-free, but I’m still overwhelmed by the possibilities and the time it would take to try them all. I’m teaching a homeschool co-op class on this in September, and I’m discovering that I definitely got myself in over my head. Thank you so much for this post!
Yes, I did cook my black beans. I’m not sure that soaking would be enough. But, I’ve never tried it. So I really don’t know for sure. I’ve never used a tannin. I’m not familiar with the use of them when dying with plant material. I know they are used in other projects, preserving animal hides comes to mind.
The possibilities are endless, and can feel a little overwhelming for sure. I once attended a fair in the PNW and there was a woman there dying with mushrooms. The colors she was producing blew my mind. I instantly thought, “OHhhhhhhhhh, I need to learn how to do that!”. And then redirected my thoughts away from that venture in an attempt to not complicate things for myself even more, LOL!
I wish you the best with your class. If you are open to a little unasked for advice … I would choose just 3 things (or maybe up to six, cuz I’m like that) and use those things to open the world of possibilities to your students. They can run with it from there. Or maybe just be enriched for the experience and not go any further if they choose. I would use a few kitchen staples (like the beans) and a few wild harvested flowers or herbs to show the diverse range of materials that can be used. At least one of them is going to want to explore this world more on their own. And then your job is well done 😉
Anyway … no matter how YOU CHOOSE to run YOUR CLASS … BEST WISHES! I’m going to stop typing now. Before I try to take over the class again, LOL! It sounds like so much fun!
Oh, I love your reply!!! You sound just like me giving advice to other people. I am actually in the PNW, and I also got excited about the possibilities of mushrooms and had to back off. Thank you for your enthusiasm, and your advice runs along my own thinking – it’s just hard for me to stop at “6”, but I know I have to. Thank you so much!
It is absolutely my pleasure! I hope your class turns out exactly as you would like. Tell the PNW I miss it there. Maybe it will call me back!
Making natural dye from food in your kitchen is such a fun and creative way to repurpose ingredients while adding vibrant colors to your crafts. It’s an eco-friendly method with beautiful results. If you try it, I’d love to hear how it goes in the comments. Enjoy experimenting with colors!