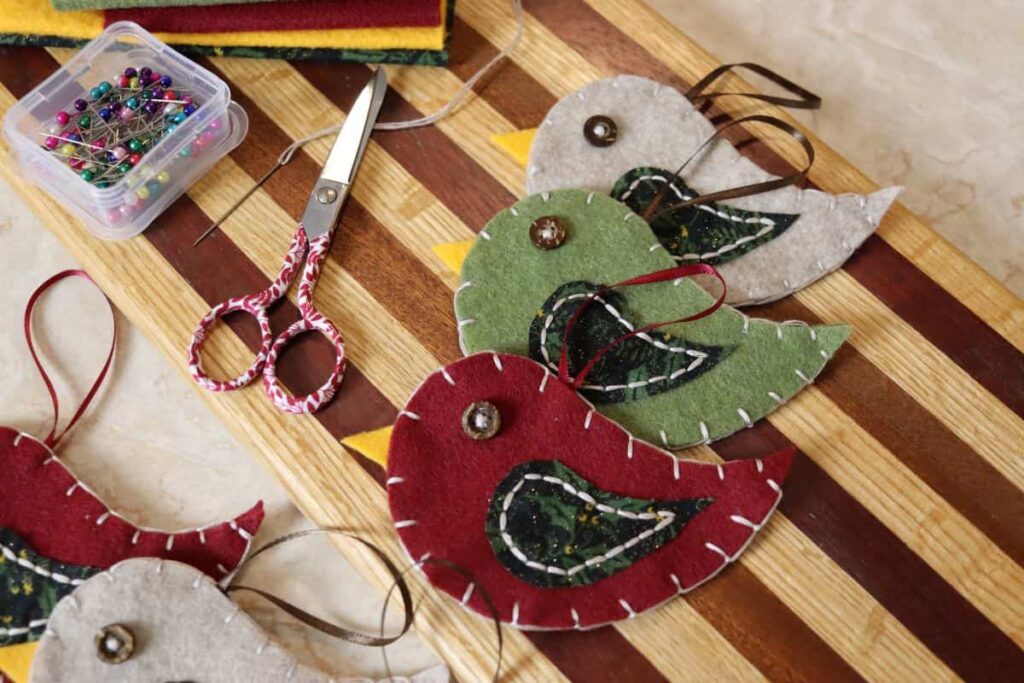
DIY Felt Bird Ornaments

These diy felt bird ornaments have that rustic, folksy charm that fits so nicely in a handmade Christmas. They’re made with simple, affordable materials, that are easy to customize to your own color palette, they lie flat for storage, and tuck perfectly onto the branches of your tree.
If you’re looking for more rustic handmade ornaments to make for your tree this year, give my gingerbread man ornaments and my simple fabric star ornament a try next.

Let’s talk about this project
I heard long ago that having a bird on your Christmas tree was said to bring good fortune in the coming year, which is probably why these little felt birds have a permanent place in my Christmas holiday celebration. And honestly, if one bird brings luck, then a whole flock has to be even better, right?!?! They’re simple to cut, easy to stitch, and relaxing to work on when you are snuggled in on the couch on a cold winter afternoon — the kind of project that makes the season feel a little more handmade and intentional.
These DIY felt bird ornaments also blend beautifully with other handmade touches on the tree. If you enjoy a traditional, nature-inspired look, pair them with an old-fashioned natural popcorn garland for a bit of nostalgic charm. Or go with a more rustic, upcycled style by adding a simple wine cork garland to bring your love of vino into the décor. Either way, they make a sweet addition to your holiday decor and come together with a calm, creative flow that feels so good at this time of year.
Materials you’ll need
- Free pattern: Download my FREE DIY felt bird ornament pattern to get started.
- Felt: Standard craft felt works well for these ornaments, and is easy to find in any craft store. If you want to level them up a bit — especially for gifting — you can choose a wool-blend felt, which has a smoother finish and holds its shape beautifully.
- Cotton fabric: Choose a cotton print that pairs well with your felt; small-scale patterns usually look best on this ornament and help the wing shape stand out clearly.
- Buttons: Use lightweight buttons for the eyes, sized appropriately for the bird’s face, so the features stay balanced; wooden or novelty shapes both work well.
- Embroidery thread: Select embroidery floss in a contrasting color that will pop against your felt and cotton, giving each stitch the definition that makes handmade ornaments stand out from the crowd.
- Ribbon: Choose a thin ribbon with enough body to hold its loop shape when hung on the tree; coordinating or slightly contrasting colors both look lovely.

Equipment you’ll need
- Scissors: Use sharp, fabric-only scissors to get crisp, clean cuts in the felt and cotton cutouts, without snagging the fibers.
- Sewing needle: Choose a needle with an eye large enough for embroidery floss but fine enough to glide smoothly through the felt.
- Needle threader: Keep a threader handy to help pull multiple strands of floss through the needle’s eye quickly and cleanly.
- Sewing pins: Use long pins with bright heads so they stay visible in thick felt layers and hold pattern pieces securely while cutting and sewing.
How to make DIY felt bird ornaments
Making these diy felt bird ornaments is a calm, hands-on project that comes together at an easy, enjoyable pace. Once you settle in with your materials, the simple shapes and relaxed stitching make the whole process a wonderfully relaxing experience.


Step 1: Print and cut the pattern.
Print the template at full scale, cut out each paper shape, pin them securely to your felt and fabric, and cut with slow, steady strokes for clean, accurate pieces.
Step 2: Sew the wings on.
Place a wing on each of the body panels, pin them in position, and backstitch around the edge with three strands of floss so the decorative outline stays bold and even.
Would you like to save this post for later?


Step 3: Sew the beaks and button eyes. Position the beak neatly on the front body panel and stitch it in place with small, controlled stitches, then anchor the buttons on each of the panels so they sit centered and secure them in place.
Step 4: Tack the loop inside.
Fold your ribbon into a loop and tack it to the top inside edge of the front body panel, keeping your stitches tight and hidden so the hanger stays strong without showing through.

Step 5: Sew the body together. Align both body panels, with wrong sides together, and blanket stitch around the entire shape, keeping your spacing uniform to give the ornament a tidy, polished finish.
Diane Gail’s tips for success
- Prepare your pieces with intention: Keep your scissors steady and your hand relaxed so every curve of the bird body stays smooth and balanced. Clean, confident cuts make the stitching look neater and the final ornament more polished.
- Keep stitch tension consistent: Maintain even tension on both your backstitch and blanket stitch so the edges don’t ripple and the ornament keeps its shape over time.
- Use pins strategically: Place pins along key curves — especially around the wings — to keep layers from shifting as you sew. This ensures your decorative stitches stay aligned with the edges.
- Match thread and needle thoughtfully: Pair your embroidery floss with a needle that slides cleanly through felt without widening the holes, giving your stitches a tidy, professional look.
- Shape ornaments as you go: Pause periodically while blanket stitching to gently smooth the felt with your fingers, helping the bird keep its silhouette as you close the seam.


DIY Felt Bird Ornaments
Equipment
- Fabric scissors
- Sewing needle
- needle threader
- Sewing pins
Materials
- FREE pattern linked in instructions below
- felt one color for body, one for beak
- cotton fabric solid or patterned to match body felt
- button
- embroidery thread contrasting with felt and fabric colors
Instructions
- Print and cut the pattern: Print the free bird ornament pattern at full scale, pin the pieces to your felt and fabric, and cut them out cleanly — cutting two each of the body and wings, and one beak.
- Sew the wings: Stitch each wing onto its body panel using a neat backstitch.
- Add the beak: Center the beak on the front panel and stitch it securely in place.
- Sew the eyes: Attach button eyes to each panel with tight, even stitches.
- Attach the hanging loop: Fold the ribbon into a loop and tack it to the top of the front panel.
- Sew the body together: Align the body panels, wrong sides together, and blanket stitch around the bird for a clean finish.
Notes
- Keep your cuts deliberate: Slow, smooth cutting creates clean edges that make the stitching look neater.
- Stitch with steady tension: Even tension on your backstitch and blanket stitch helps the ornament keep its shape.
- Pin before sewing: Secure each piece with a few well-placed pins to prevent shifting while you stitch.
- Match needle and floss: Use a needle that accommodates embroidery floss without stretching the felt.


These felt bird ornaments are a sweet and whimsical addition to any holiday tree. They’re simple to make and add a lovely handmade touch to your decor. If you create your own, I’d love to hear how they turn out in the comments. Happy crafting!
I love this! It was just what I was looking for! Thank you!
You’re so welcome. Have fun making your birds. Happy Holidays!