DIY Felt Heart Garland

This diy felt heart garland comes together in less than an hour, uses basic materials, and adds a sweet little handmade touch to your Valentine’s Day décor. It delivers a finished piece, with a beautifully balanced design, you just may want to keep up long after the holiday passes.
You can pair this with other simple seasonal ideas that you find in my crafting a heartfelt Valentine’s Day post, like baking a Persian love cake for two, or setting the table with simple lip appliqué fabric napkins for a cozy, intentional celebration.
Let’s talk about this project
I wanted to make a little something to hang in my home for Valentine’s Day — something that would quietly remind me of the love that surrounds me every day whenever it caught my eye. This project fit the bill perfectly. It didn’t take much time, it used simple materials I always enjoy working with, and I’m even happier than I thought I would be with how it turned out.
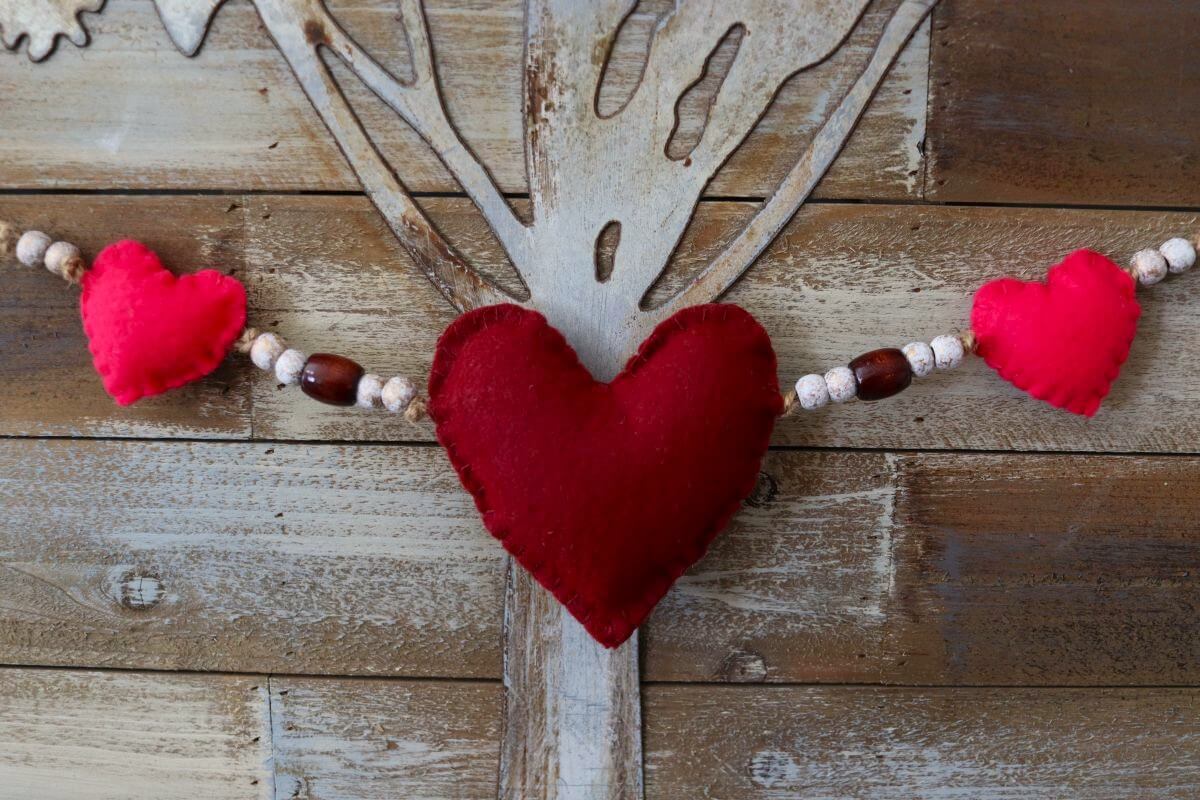
The soft felt hearts, natural twine, and simple wooden beads keep the overall look of this garland rustic. And yet there’s something slightly refined about its aesthetic that I can’t quite put my finger on. It fits right in with my own personal style, and you can easily adjust the color and texture to suit yours as well.
Garlands are a really easy way to add seasonal or holiday accents to your home décor. And if you love making them as much as I do, you’ll want to try my wine cork decor strand, fall-themed bead and fabric strand, Halloween-themed hanging flags, or my old-fashioned tree garland next.
Materials you’ll need
- FREE pattern: Download my FREE heart pattern to get started.
- Felt: One or two colors, depending on whether you want a uniform look or subtle variation in your hearts. Standard craft felt works well for this project, but if you want to level them up a bit — especially for gifting — you can choose a wool-blend felt, which has a smoother finish.
- Embroidery thread: Choose a thread that closely matches the felt so the blanket stitch blends into the edge rather than competing with it.
- Fiber fill: Packed firmly into each heart to give them a plump, defined shape when stitched and hung.
- Beads: Wood or lightweight beads work best; make sure the holes are large enough to comfortably pass jute twine through them without forcing it.
- Jute twine: Natural jute gives the garland structure and a rustic finish; avoid very thin twine, which won’t support the weight of the hearts and beads.

Equipment you’ll need
- Craft scissors: Used for cutting the paper pattern, so your fabric scissors stay sharp for felt only.
- Sewing pins: Fine pins work best to keep the pattern flat against then felt when cutting without distorting the edges.
- Fabric scissors: A sharp pair makes a noticeable difference when cutting felt, especially around the curves.
- Sewing needle: A standard hand-sewing needle with a comfortable eye makes blanket stitching easier on thicker felt.
- Tape measure: Used to measure the length of jute twine before assembling the garland.
- Large sewing needle: Large enough to thread jute twine through the eye and pull it through the finished hearts, running between the felt layers and through the stuffing, without damaging the shape.
How to make a DIY felt heart garland


Step 1: Use the large heart pattern to cut two felt pieces for the center heart. Use the small heart pattern to cut four felt pieces for the smaller hearts.
Step 2: Stitch around the outside edges of each heart using a blanket stitch, leaving about a 2-inch opening along one side. Leave the thread attached so it can be used to close the heart after stuffing.
Would you like to save this post for later?


Step 3: Stuff each heart firmly with fiber fill through the opening, then sew it closed once the shape is full and well defined.
Step 4: Cut a 2-foot length of jute twine. Tie a loop at one end for hanging, then tie a double knot about 4 inches below the loop.
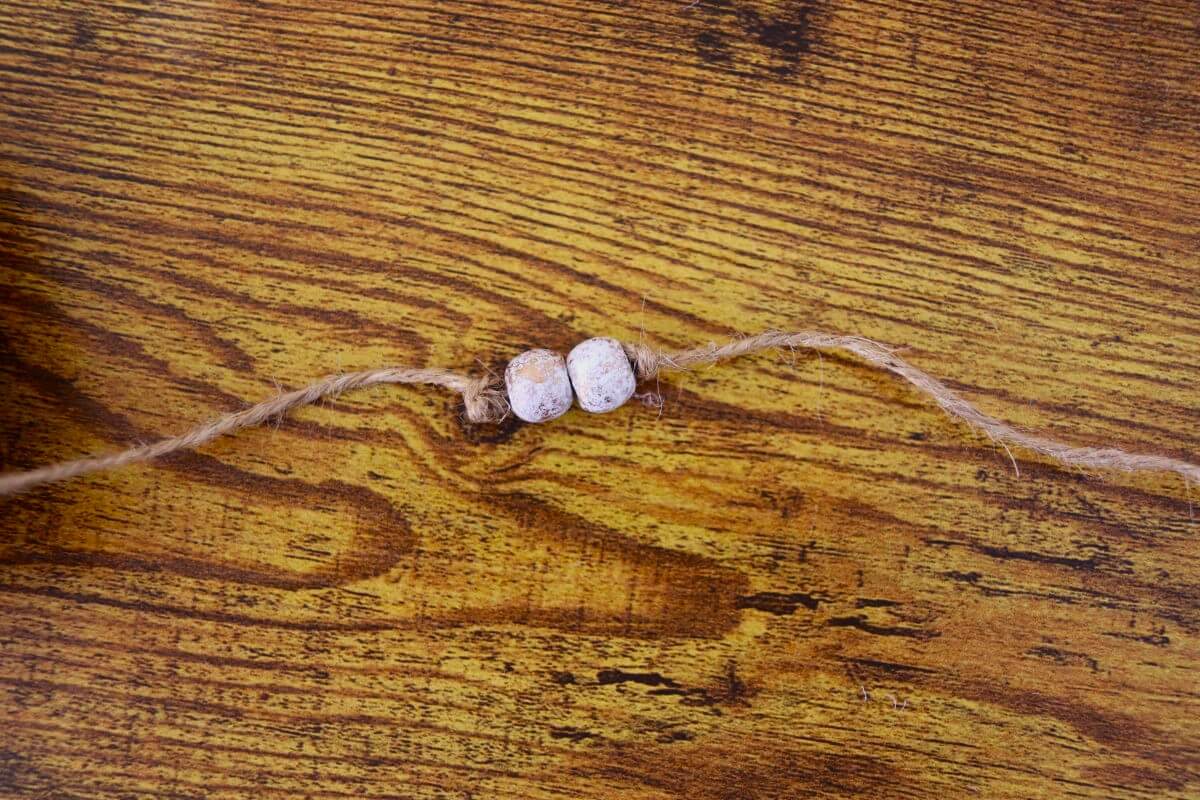

Step 5: String on a set of beads, of your choice, and secure them with another double knot.
Step 6: Using a large needle, pull the jute twine through one small felt heart. Thread it between the two layers of felt, passing through the stuffing just below the cleft at the top of the heart. Secure it with a double knot.


Step 7: Add another set of beads, then tie another double knot to secure them.
Step 8: Thread the twine through the large center heart, the same way you did with the small hearts. Secure it with a double knot. Repeat the bead-and-heart pattern on the other side as a mirror image, then finish by tying a loop at the opposite end for hanging.

If you’re looking for a little inspiration for your Valentine’s Day dinner, you might want to give my creamy Tuscan shrimp recipe a try. And it certainly wouldn’t hurt to make a batch of jammy heart imprint cookies to spread the love a little, too.
Diane Gail’s tips for success
- Stabilize: Wrap the cut end of the jute twine with tape before threading it through the needle; it keeps the fibers compact and makes passing through the eye of the needle far easier.
- Control: Double knot the twine immediately after each bead group and each heart so the spacing stays fixed and the garland doesn’t shift once it’s hung.
- Shape: Stuff the hearts firmly and evenly so they hold their form and don’t collapse or twist when threaded onto the twine.
- Position: Pull the twine through the heart just below the cleft so the heart hangs straight and stays visually centered.


DIY Felt Heart Garland
Equipment
- Craft scissors
- Sewing pins
- Fabric scissors
- tape measure
- Sewing needle
- large sewing needle
Materials
- FREE pattern linked in instructions below
- felt color of choice
- embroidery thread to match felt
- fiber fill
- jute twine
Instructions
- Cut: Print the FREE heart pattern at full scale and use it to cut two felt pieces for one large heart and four felt pieces for two small hearts.
- Stitch: Sew around the edges of each heart using a blanket stitch, leave a small opening along one side and keep the thread attached.
- Stuff: Fill each heart firmly with fiber fill through the opening so the shape is full and well defined.
- Close: Stitch the opening closed, shaping the heart as needed so the edges remain smooth.
- Measure: Measure and cut a 2-foot length of jute twine, then tie a loop at one end for hanging.
- Anchor: Tie a double knot about 4 inches below the loop to set the starting point for the garland.
- Thread: Add beads to the twine and secure them with a double knot to lock the spacing in place.
- Attach: Pull the twine through a small heart using a large needle, passing between the felt layers and through the stuffing just below the cleft.
- Secure: Tie a double knot after the heart to keep it from shifting once hung.
- Repeat: Add another set of beads, then thread the large heart the same way, knotting after it before mirroring the pattern on the opposite side.
- Finish: Tie a loop at the end of the twine for hanging and adjust spacing if needed.
Notes
- Stabilize: Wrap tape around the cut end of the jute twine to keep the fibers from unraveling while threading beads and hearts.
- Position: Pull the twine through the heart just below the cleft so the heart hangs straight and stays visually centered.
- Control: Knot the twine immediately after each bead group and heart to prevent shifting once the garland is displayed.
- Shape: Stuff the hearts firmly and evenly so they hold their form and don’t collapse or twist on the strand.