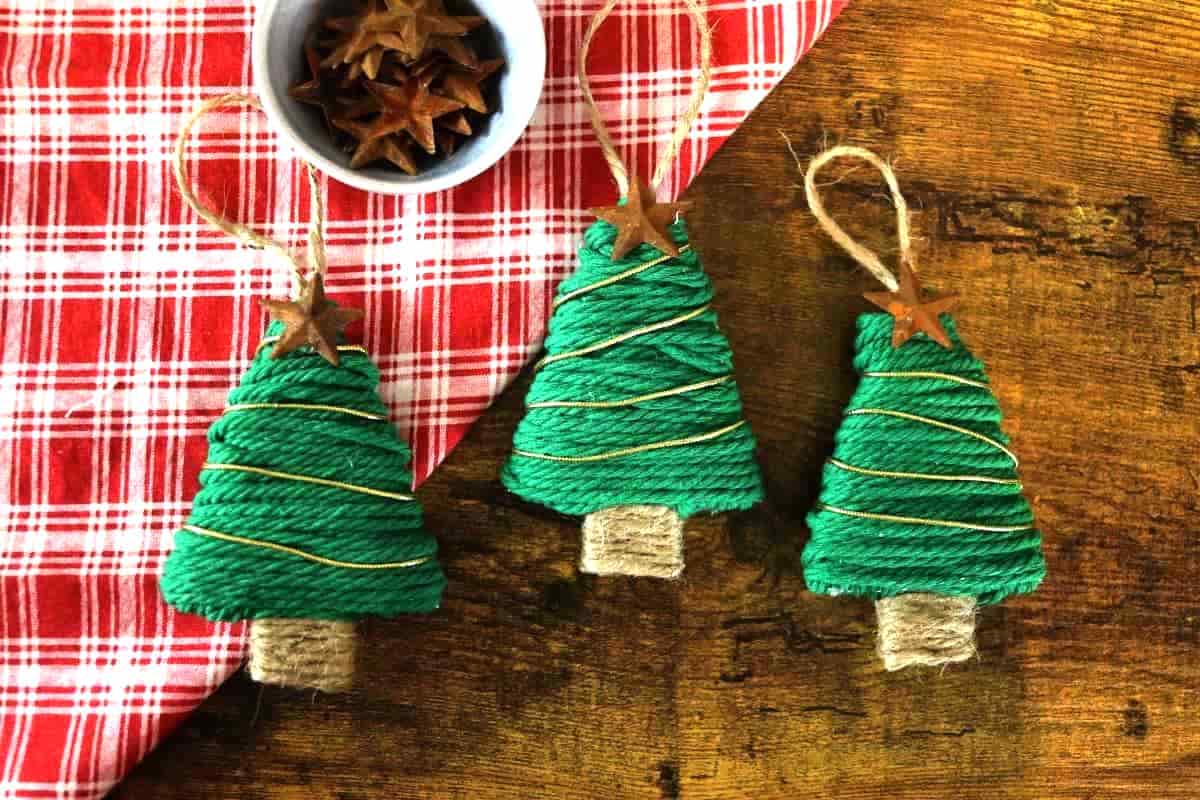
DIY Tree Shaped Ornament

This diy tree shaped ornament is one of those simple holiday crafts that brings a warm, handmade touch to your Christmas decorating. It comes together quickly, uses inexpensive materials you likely already have on hand, and adds a sweet bit of rustic charm to your home décor for the season.
If you’re looking for other quick ornament projects that have rustic charm, try my twine wrapped star ornaments and cookie cutter ornaments tutorials next.
Let’s talk about this project
This project is wonderfully approachable, even if you’re not a frequent crafter. At its core, you’re wrapping cord around a small cardboard tree cutout — a simple method that turns into something surprisingly polished once it’s done. The key is keeping your wraps snug and steady, especially around the edges where gaps like to show if the cord isn’t guided with intention. Adults can put these together in 10–15 minutes, and older kids, who can safely handle a glue gun, enjoy helping with the process too.
It’s also the kind of project that encourages you to slow down for a moment and enjoy working with your hands. A warm drink nearby, a quiet winter afternoon, and a simple craft created with natural textures — it all adds up to a peaceful little pause in the holiday rush, much like making cranberry orange garland or baking gingerbread salt dough ornaments can do.
Materials you’ll need
- Cardboard: Provides a sturdy base and clean shape for wrapping the ornament.
- Twine or cord: Choose one color for the trunk and loop, then switch to a second color to wrap the body of the tree.
- Decorative cord or thin ribbon: Creates a festive garland effect that gives the ornament its finished charm.
- Hot glue sticks: Ensures each wrap and embellishment stay secure.
- Small metal star or wooden button: Serves as a simple, rustic topper to complete the tree design.

Equipment you’ll need
- Ruler: Helps you draw an even, well-proportioned tree shape on the cardboard.
- Pen or pencil: Used to sketch the outline before cutting.
- Craft scissors: Makes cutting the cardboard smooth and precise.
- Hot glue gun: Essential for attaching all cords, accents, and finishing details to the ornament.
- Cutting surface or mat: Protects your workspace while you cut and assemble the ornament.
How to make a DIY tree shaped ornament
This project comes together quickly once you get started. Follow the steps below, and you’ll have a handmade ornament full of rustic holiday charm in no time.


Step 1: Create the tree template.
Sketch a simple tree shape onto cardboard using a ruler for clean lines. Cut it out carefully, making one template for each ornament you want to make.
Step 2: Wrap the trunk.
Glue the end of your chosen twine or cord to the back of the trunk area. Wrap the trunk neatly, securing the end with glue on the back of the ornament.
Would you like to save this post for later?


Step 3: Add the hanger.
Cut a 6-inch length of twine or cord, form a loop, and glue both ends to the back of the cardboard to make a hanger.
Step 4: Wrap the tree.
Glue the end of your main wrapping cord to the back of the tree shape. Wrap the entire tree, including edges, until the cardboard is fully covered. Glue the finishing end securely to the back.


Step 5: Add the garland.
Glue one end of your decorative cord or ribbon to the back of the tree. Wrap it diagonally around the ornament like a garland, securing the end on the back.
Step 6: Attach the topper.
Glue your small metal star or wooden button to the front of the ornament at the peak of the tree.

Diane Gail’s tips for success
- Use sturdy cardboard: Pick a piece that’s thick enough to hold its shape as you wrap the cord around it, because thinner cardboard tends to bow once tension is added.
- Keep your wraps snug: Pull the cord just tight enough to cover the cardboard cleanly; too loose creates gaps, but too tight can twist the template.
- Mind the edges: Pay extra attention along the sides, guiding the cord slowly so it hugs the outline and prevents the cardboard from showing through later.
- Choose contrasting colors: Pairing two different cords, one for the trunk and loop and one for the tree, gives the ornament definition without needing a complicated pattern.
- Be generous with glue: Secure each starting and ending point well, to keep the wraps from shifting as the ornament ages in storage.


DIY Tree Shaped Ornament
Equipment
- Ruler
- pen
- Scissors
- hot glue gun
Materials
- cardboard
- jute twine
- macrame cord
- decorative cord or ribbon
- hot glue sticks
- small metal star or wooden button
Instructions
- Create the tree template: Draw a small tree shape on cardboard and cut it out for the base of your ornament.
- Wrap the trunk: Glue the end of your chosen cord to the back of the trunk area and wrap until fully covered, securing the end with glue.
- Add the hanging loop: Cut a piece of cord, form a loop, and glue both ends to the back of the template so the ornament can hang.
- Wrap the tree: Glue the end of your main cord to the back of the tree shape and wrap the entire surface, guiding the cord snugly around the edges.
- Add the garland: Glue one end of decorative cord to the back, wrap it diagonally like a garland, and secure the end with glue.
- Attach the topper: Glue the star or button to the top of the tree and let the glue cool and harden before handling.
Video
Notes
- Use sturdy cardboard: Choose a piece thick enough that it won’t bend once you start wrapping the cord around it.
- Keep the cord snug: Wrap with gentle, steady tension so gaps don’t appear and the shape doesn’t warp.
- Smooth the edges: Take your time along the sides to keep the outline clean and prevent the cardboard from peeking through.
- Switch colors intentionally: Using one cord for the trunk and loop and a contrasting color for the tree adds definition with very little effort.
- Secure glue points well: Anchor each starting and ending point generously so the wraps stay tight and the ornament lasts for years.
- Store carefully: Lay flat in a box to prevent the wrapped details from shifting or being crushed during storage.


This tree-shaped ornament is a lovely way to add a personal touch to your holiday decor or to make a meaningful gift. It’s a simple yet charming craft project. If you give it a try, I’d love to hear how it turns out in the comments. Have fun crafting!