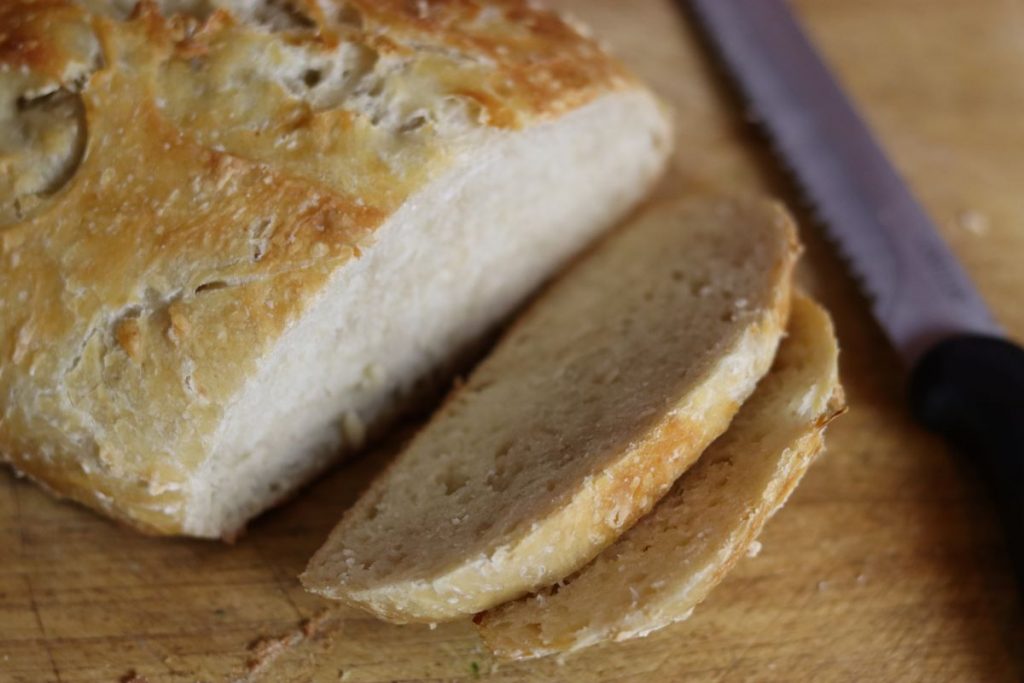
No-Knead Shaggy Dough Bread

No-knead shaggy dough bread is a rustic artisan loaf made from a loose, rough dough that requires no kneading. The long rise develops flavor and structure, producing a crisp crust and tender interior. This method keeps homemade bread simple while still delivering consistent, bakery-style results.
All the homemade goodness, without all the effort
My bread-making journey started with this very loaf, and years later, it’s still the one I reach for most often when I need a dependable homemade bread recipe.
While I regularly bake an easy rosemary parmesan loaf, authentic New York bagels, and savory pumpkin bagels, this no-knead shaggy dough bread remains the simplest and most reliable option in my kitchen. It consistently delivers structure, flavor, and versatility in everyday use.
It’s versatility is what keeps it in rotation. The sturdy crumb makes it ideal for a cheddar apple grilled cheese, a triple-decker turkey club, or a loaded chicken salad sandwich. It also pairs naturally with soups — like homestyle pork stew, creamy celeriac, or tangy red cabbage soup.
Recipe ingredients
Special notes are made in this bulleted list to assist you.
- Bread flour: Bread flour has a higher protein content than all-purpose flour, which builds stronger gluten during the long rise. In this no-knead shaggy dough bread, that strength helps the dough hold its shape, rise well in the oven, and develop a crisp crust with an open interior.
- Active dry yeast: Active dry yeast provides steady fermentation for an overnight rise. It supports consistent lift and balanced flavor development, making it a dependable choice for this style of rustic bread.
See the recipe card for full information on ingredients and quantities.
Would you like to save this post for later?
How to make no-knead shaggy dough bread
Step 1: Pour 1 1/2 cups warm water (100–110°F) into a large mixing bowl. Sprinkle 3/4 teaspoon active dry yeast over the water and let it sit for 5–10 minutes until dissolved and slightly foamy. This confirms the yeast is active before adding the flour.
Step 2: Add 3 cups bread flour and 2 teaspoons salt to the bowl. Stir with a wooden spoon until no dry flour remains. The dough will look rough, sticky, and uneven — that’s exactly what you’re looking for. Do not knead and do not add extra flour. The high moisture level is what allows this no-knead shaggy dough bread to develop structure during the long rise.
Step 3: Cover the bowl tightly and leave it at room temperature (68–72°F) for 12–18 hours. The dough should at least double in size and develop visible surface bubbles. Properly fermented dough will look expanded, slightly domed, and airy when gently pressed.
Step 4: Place a covered Dutch oven into the oven and preheat to 450°F. Allow the pot to heat for at least 30 minutes. A fully preheated pot creates the steam environment needed for the bread to develop a strong oven spring and crust formation.
Step 5: Turn the dough out onto a lightly floured surface. With floured hands, fold the edges toward the center 3–4 times to form a loose round. Avoid pressing or kneading. The goal is to create light surface tension while preserving the air developed during fermentation. Place seam-side down on parchment paper and let rest while the oven finishes heating.
Step 6: Using a sharp knife or bread lame, make one confident slash about 1/2 inch deep across the top of the dough. This gives the bread a controlled place to expand as it bakes. Without scoring, the crust may split unevenly along the sides. Make the cut quickly and decisively to avoid dragging the dough.
Step 6: Carefully remove the fully preheated Dutch oven from the oven. Using the parchment paper as a sling, lower the dough into the hot pot. You should hear a slight sizzle as the dough hits the heated surface — that initial burst of heat helps create oven spring. Cover immediately with the lid and return it to the oven.
Bake covered for 30 minutes. During this time, the trapped steam allows the loaf to expand before the crust fully sets.
Step 7: After 30 minutes, remove the lid and continue baking for another 15–20 minutes. This uncovered stage allows the crust to deepen in color and fully develop structure. The finished loaf should be a rich golden brown.
For best accuracy, the internal temperature should read between 205–210°F. If you don’t use a thermometer, tap the bottom of the loaf — it should sound hollow and the loaf should feel light for it’s size.
Step 8: Transfer the bread to a wire rack and allow it to cool completely. As tempting as it is to slice while warm, the interior is still setting during this stage. Cutting too early can compress the crumb and create a slightly gummy texture. Waiting ensures a cleaner slice and better structure.
Top tips
- Expect a wet, sticky dough from the start: No-knead shaggy dough bread is intentionally high in moisture. The dough will not resemble traditional kneaded bread and should not feel smooth or firm. Resist adding flour to make it easier to handle, as that will reduce oven spring and tighten the crumb.
- Use time as your main ingredient: The long rise is what builds structure in this bread. Shortening the fermentation window can lead to a dense loaf, even if the dough appears to have risen. Whenever possible, allow the full overnight rise for the best texture and flavor.
- Adjust slightly for room temperature: If your kitchen runs cool, the dough may need a few extra hours to fully rise. If it runs warm, check it closer to the 12-hour mark. The dough should look expanded and bubbly before shaping.
- Handle the dough gently when shaping: The air pockets formed during the long rise are what create the open interior. Overhandling or pressing down firmly can collapse that structure. Use light movements and minimal contact to preserve the texture.
Other recipes you’ll love
If you loved this bread recipe, give these other great recipes a try too!
Savory Pumpkin Spice Cornbread Recipe
Quick Tortilla Recipe
Easy Roasted Garlic Crackers Recipe
Cinnamon Sugar Cracker Recipe
Rosemary Parmesan Crackers Recipe
Easy Homemade Everything Cracker Recipe

No Knead Bread Recipe
Ingredients
- 3 cups bread flour
- 1 1/2 cups warm water 100–110°F
- 2 teaspoon salt
- 3/4 teaspoon active dry yeast
Instructions
- Pour 1 1/2 cups warm water (100–110°F) into a large bowl. Sprinkle 3/4 tsp active dry yeast over the water and let sit 5–10 minutes until dissolved and slightly foamy.
- Add bread flour and salt. Stir until no dry flour remains and a rough, sticky dough forms. Do not knead.
- Cover tightly and let rise at room temperature (68–72°F) for 12–18 hours, or until doubled in size and bubbly.
- Place a covered Dutch oven in the oven and preheat to 450°F (232°C). Heat the pot for at least 30 minutes.
- Turn dough onto a lightly floured surface. Gently fold edges toward the center 3–4 times to form a loose round. Place seam-side down on parchment paper.
- Using a sharp knife or bread lame, cut one 1/2-inch-deep slash across the top of the dough.
- Transfer dough (using parchment) into the hot Dutch oven. Cover and bake 30 minutes.
- Remove lid and bake 15–20 minutes more, until deep golden brown and internal temperature reaches 205–210°F (96–99°C).
- Transfer to a wire rack and cool completely before slicing.
Notes
- Measure flour properly: Spoon bread flour into the measuring cup and level it off to avoid packing too much flour, which can make the dough dry and dense.
- Expect a sticky dough: This is a high-hydration dough and should feel loose and tacky; adding extra flour will reduce oven spring and tighten the crumb.
- Adjust rise time as needed: If your kitchen is cooler than 68°F, allow additional time for the dough to fully rise before baking.
- Preheat the Dutch oven fully: A thoroughly heated pot is essential for strong oven spring and proper crust development.
- Cool completely before slicing: Allow the loaf to cool fully so the interior sets properly and avoids a gummy texture.
Nutrition
Nutrition information is automatically calculated, so should only be used as an approximation.

This looks delicious! I can’t wait to make it! 🙂
Thanks Jill! Hope you like it 😉
This no-knead bread is incredibly easy to make and bakes up with a perfectly crispy crust and soft, airy interior. It’s a great recipe for beginners and experienced bakers alike. If you try this recipe, I’d love to hear what you think. Be sure to leave a review and let me know how it turned out for you. If you have any questions, feel free to ask in the comments — I’m happy to help!