Farmhouse Style Homemade Butter
Farmhouse style homemade butter is one of the most direct and traditional ways to work with cream in the kitchen. Using nothing more than heavy cream and a simple technique, cream turns into fresh butter and buttermilk. It’s a practical, repeatable skill that works whether you’re using raw cream or store-bought cream.
Servings 24 servings
Instructions
- Whip: Whip the cream in a stand mixer, fitted with the whisk attachment, starting on the lowest speed.
- Thicken: Gradually increase the speed as the cream thickens, whipping until it turns into fully formed whipped cream without splashing out of the bowl.
- Separate: Switch to the paddle attachment and continue beating, increasing speed gradually, until the butter separates from the buttermilk.
- Drain: Drain the buttermilk through a sieve into a bowl and gather the butter together in another bowl.
- Press: Squeeze the butter together into a ball, removing as much remaining liquid as you can.
- Wash: Transfer the butter to a bowl of ice water to keep it chilled while working with it, and squeeze out any remaining buttermilk.
- Season (optional): Sprinkle salt over the butter, and distribute it evenly throughout it using a fork, if you want salted butter.
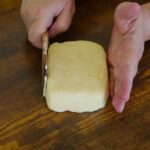
- Shape: Form the butter into the shape you prefer.
Notes
- Increase speed gradually: Starting slow and increasing speed as you progress helps prevent splashing and keeps the process controlled.
- Scrape the bowl: Keeping the cream moving evenly helps the butter separate more cleanly.
- Press thoroughly: Removing as much buttermilk as possible before washing improves the final texture.
- Wash completely: Washing the butter removes lingering buttermilk that can affect keeping quality.
- Salt if desired: Add salt only if you prefer salted butter; unsalted butter offers more flexibility for everyday cooking.
- Freeze extras: Butter freezes very well and generally keeps its quality when wrapped tightly.
